Active DirectoryによるSAMLシングルサインオン - ADFS
Sigmeは、SAML 2.0 IdPに対して認証するように設定することができます。Microsoft Active Directory Federation Servicesは、このようなIdPとして機能するように設定することができます。
- サーバーにADFSのロールをインストールします。
IdP を公開する予定の URL に対して、有効な SSL 証明書が必要である。この例では、https://fs.test.alexharrington.co.uk でIdPを公開しています。この記事が公開される頃には、このIdPは存在しないでしょう。同様に、Xibo CMSも有効なSSL証明書で保護されたサーバーでホストされている必要があります。
IdPをインストールしたら、Xibo CMSサーバーと、ユーザーが認証に使用するクライアントコンピューターの両方から、設定したURLのIdPウェブページにアクセスできることを確認します。
例えば、https://fs.test.alexharrington.co.uk/adfs/ls/ にアクセスすると、ADFS が提供する Web ページが表示され、エラーが発生するはずです。これは正常です。ここでは、接続性を確認しているだけです。
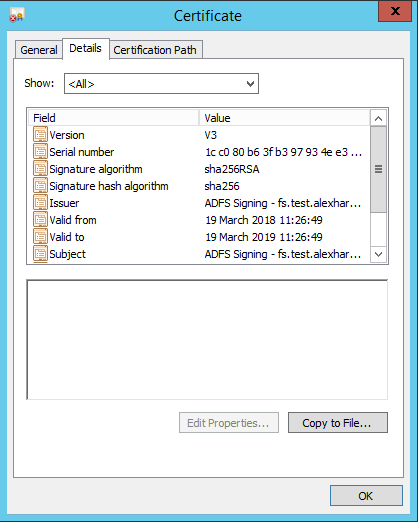
まず、ADFSから署名証明書をエクスポートする必要があります。
- ADFSコンソールを開き、
Service > Certificatesに移動し、Token-signing certificateを見つけます。

-
右クリックし、
証明書の表示を選択します。 詳細に移動し、ファイルにコピー...をクリックします。
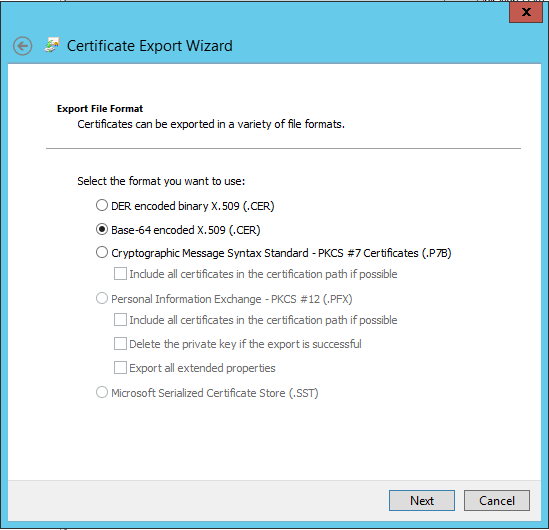
Base-64 encoded X.509形式を選択し、ファイルを適当な場所に保存してください。
Sigme CMS の settings.php または settings-custom.php ファイルを編集し、以下の SAML 設定例を追加してください。
$authentication = new \Xibo\Middleware\SAMLAuthentication();

$samlSettings = array (
   'workflow' => array(
        // Enable/Disable Just-In-Time provisioning
        'jit' => true,
        // Attribute to identify the user
        'field_to_identify' => 'email',   // Alternatives: UserID, UserName or email
        // Default libraryQuota assigned to the created user by JIT
        'libraryQuota' => 1000,
        // Initial User Group
        'group' => 'Users',
        // Home Page
        'homePage' => 'icondashboard.view',
        // Enable/Disable Single Logout
        'slo' => false,
        // Attribute mapping between XIBO-CMS and the IdP
        'mapping' => array (
            'UserID' => '',
            'usertypeid' => '',
            'UserName' => 'uid',
            'email' => 'mail',
        )
    ),
   // Settings for the PHP-SAML toolkit.
   // See documentation: https://github.com/onelogin/php-saml#settings
   'strict' => false,
   'debug' => true,
   'idp' => array (
            'entityId' => 'https://<yourcms>/saml/acs',
            'singleSignOnService' => array (
                'url' => 'https://<yourIdP>/adfs/ls',
            ),
            'singleLogoutService' => array (
                'url' => 'http://idp.example.com/simplesaml/saml2/idp/SingleLogoutService.php',
            ),
            'x509cert' => '<yourCert>',
        ),
   'sp' => array (
        'entityId' => 'https://<yourCMS>/saml/acs',
        'assertionConsumerService' => array (
            'url' => 'https://<yourCMS>/saml/acs',
        ),
        'singleLogoutService' => array (
            'url' => 'https://<yourCMS>/saml/sls',
        ),
        'NameIDFormat' => 'urn:oasis:names:tc:SAML:1.1:nameid-format:emailAddress',
        'x509cert' => '',
        'privateKey' > '',
    ),
    'security' => array (
        'nameIdEncrypted' => false,
        'authnRequestsSigned' => false,
        'logoutRequestSigned' => false,
        'logoutResponseSigned' => false,
        'signMetadata' => false,
        'wantMessagesSigned' => false,
        'wantAssertionsSigned' => false,
        'wantAssertionsEncrypted' => false,
        'wantNameIdEncrypted' => false,
    )
);
必ず置き換えてください。
<yourIdP>はADFSサーバーのURLです。<yourCMS>は、Sigme CMS の URL に置き換えてください。<yourCert>はADFSからエクスポートした証明書のテキストで、-----BEGIN CERTIFICATE-----と-----END CERTIFICATE-----の行を除いて1行で記述してください。
ファイルを保存すると、ログインする際にCMSがSAML IdPにリダイレクトされるようになります。
- ADFSコンソールに戻り、
Trust Relationships -> Relaying Party Trustsに進みます。 Add Relaying Party Trustを選択し、ウィザードを開始する。Select Data Sourceステップで、CMS の SAML メタデータ URL を入力します。例えば、https://<yourCMS/saml/metadataのようになります。
さまざまな詳細オプションが表示されますが、そのほとんどはこのガイドの範囲外です。必要なオプションを選択してください。私の場合は、I do not want to configure multi-factor authentication settings for this relaying party trust at this time とPermit all users to access this relaying party を選択しました。
最後に概要が表示されます。
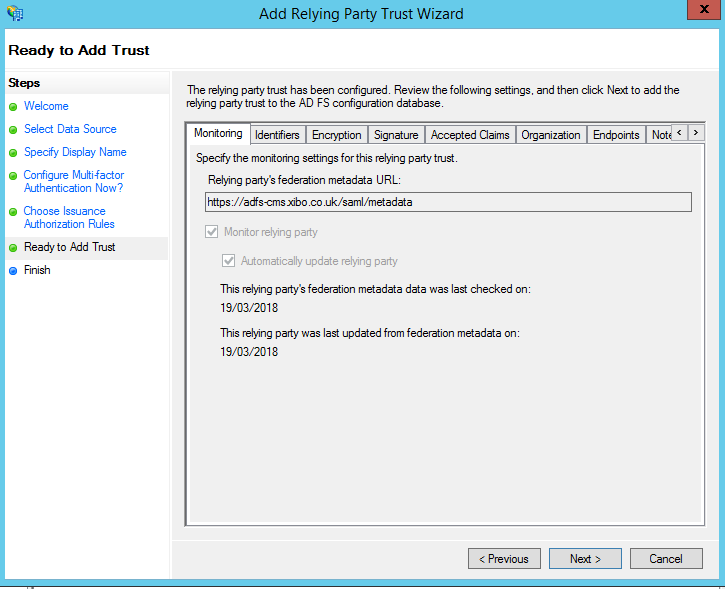
Edit Claim Rules にチェックを入れたまま、ウィザードを終了します。
3つのクレームルールを追加する必要があります。
ルールの追加をクリックし、カスタムルールを使用したクレームの送信を選択します。
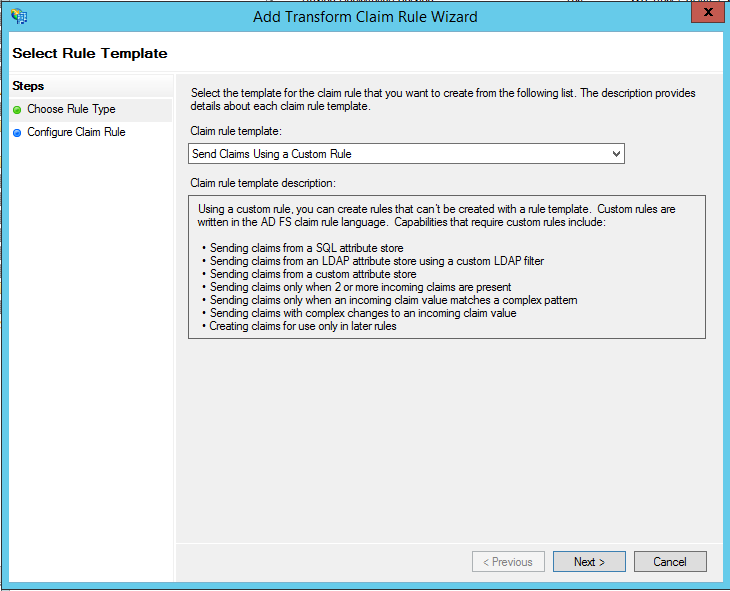
ルール名をCreate Persistent Identifier 1 とし、以下のカスタムルールを入力します。
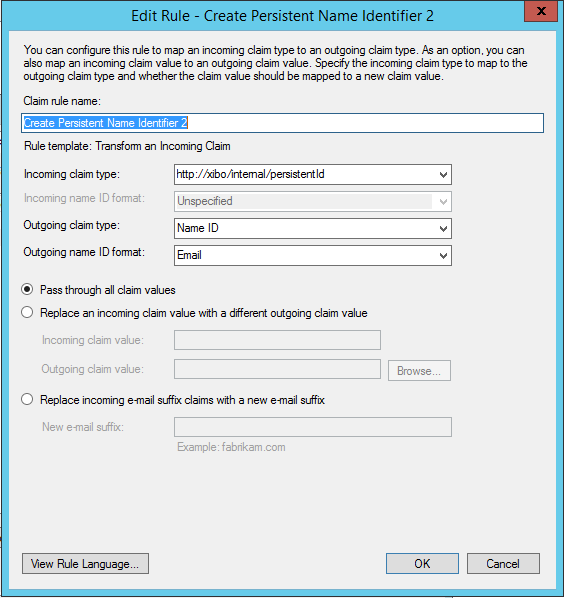
=> add(store = "_OpaqueIdStore", types = ("http://xibo/internal/persistentId"), query = "{0};{1};{2}", param = "ppid", param = c.Value, param = c.OriginalIssuer);2つ目のルールを追加し、タイプとしてTransform an Incoming Claim を選択する。このルールを Create Persistent Identifier 2 と呼び、以下のように設定する。
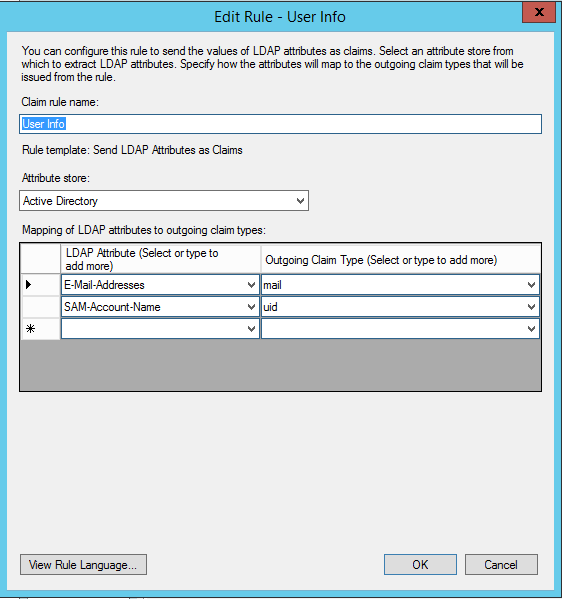
- 最後に、
Send LDAP Attributes as Claimsというタイプの3つ目のルールを追加する。これをUser Infoと名付け、以下のように設定します。
これで、Active Directory内の任意のユーザーとして、Sigme CMSにログインできるようになりました。
Active Directoryのユーザーアカウントに、有効なメールアドレスが設定されていることを確認してください。Sigme では、Active Directory の SAM-Account-Name をユーザー名として、E-Mail Addresses 欄にメールアドレスを設定して、ユーザーを作成します。